Vue lecture

Il y a de nouveaux articles disponibles, cliquez pour rafraîchir la page.

Converting a Nebra Cryptocurrency Miner To a Meshcore Repeater

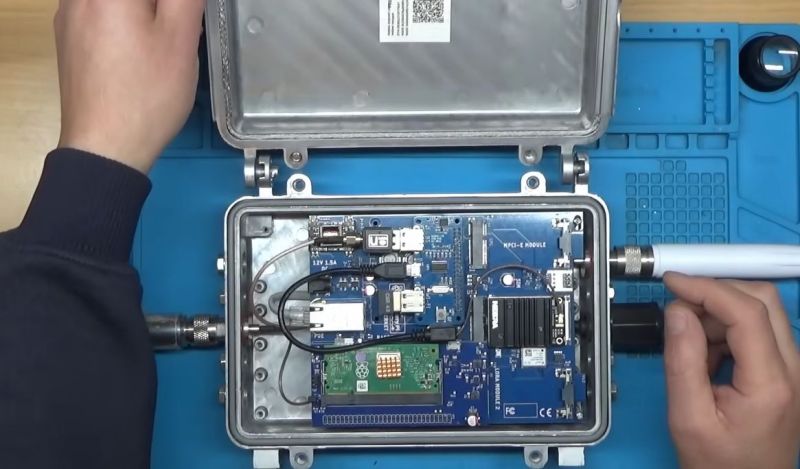
After the swivel by Helium Inc. towards simply running distributed WiFi hotspots after for years pushing LoRaWAN nodes, much of the associated hardware became effectively obsolete. This led to quite a few of these Nebra LoRa Miners getting sold off, with the [Buy it Fix it] channel being one of those who sought to give these chunks of IP-67-rated computing hardware a new life.

Originally designed to be part of the Helium Network Token (HNT) cryptocurrency mining operation, with users getting rewarded by having these devices operating, they contain fairly off-the-shelf hardware. As can be glanced from e.g. the Sparkfun product page, it’s basically a Raspberry Pi Compute Module 3+ on a breakout board with a RAK 2287 LoRa module. The idea in the video was to convert it into a Meshcore repeater, which ought to be fairly straightforward, one might think.

Unfortunately the unit came with a dead eMMC chip on the compute module, the LoRa module wasn’t compatible with Meshcore, and the Nebra breakout board only covers the first 24 pins of the standard RPi header on its pin header.

The solutions involved using a µSD card for the firmware instead of the eMMC, and doing some creative routing on the bottom of the breakout board to connect the unconnected pins on the breakout’s RPi header to the pins on the compute module’s connector. This way a compatible LoRa module could be placed on this header.

Rather than buying an off-the-shelf LoRa module for the RPi and waiting for delivery, a custom module was assembled from an eByte E22 LoRa module and some stripboard to test whether the contraption would work at all. Fortunately a test of the system as a Meshcore repeater showed that it works as intended, serving as a pretty decent proof-of-concept of how to repurpose those systems from a defunct crypto mining scheme into a typical LoRa repeater, whether Meshcore or equivalent.

Silica Gel Makes For Better 3D Prints

It’s possible to improve your 3D prints in all kinds of ways. You can tune your printer’s motion, buy better filament, or tinker endlessly with any number of slicer settings. Or, as [Dirt-E-Bikes] explains, you could grab yourself some silica gel.

If you’re unfamiliar with silica gel, it’s that stuff that comes in the “DO NOT EAT” packet when you buy a new pair of shoes. It’s key feature is that it’s hygroscopic—which means it likes to suck up moisture from the atmosphere. When it comes to 3D printing, this is a highly useful property—specifically because it can help keep filament dry. Over time, plastic filament tends to pick up some moisture on its own from the atmosphere, and this tends to interfere with print quality. This can be avoided by storing filament in a sealed or semi-seaeled environment with silica gel. The gel will tend to suck up most of the moisture from the air in the sealed container, helping to keep the filament drier.

[Dirt-E-Bikes] does a great job of explaining how best to integrate silica gel with your filament spools and automatic material changer (if you have one). He also explains the value of color changing silica gel which indicates when the material is saturated with water, as well as how to dry it out for reuse. You can even combine some of the color changing beads with the more common plain white beads recycled from your shoe boxes, since you only need a few colored beads to get an idea of the water content.

We’ve explored other filament drying solutions before, too. Video after the break.

[Thanks to Keith Olson for the tip!]

Nic Barker Explains ASCII, Unicode, and UTF-8

UTF-8 brain lifting weights

Over on YouTube [Nic Barker] gives us: UTF-8, Explained Simply.

If you’re gonna be a hacker eventually you’re gonna have to write software to process and generate text data. And when you deal with text data, in this day and age, there are really only two main things you need to know: 7-bit ASCII and UTF-8. In this video [Nic] explains 7-bit ASCII and Unicode, and then explains UTF-8 and how it relates to Unicode and ASCII. [Nic] goes into detail about some of the clever features of Unicode and UTF-8 such as self-synchronization, single-byte ASCII, multi-byte codepoints, leading bytes, continuation bytes, and grapheme clusters.

[Nic] mentions about UTF-16, but UTF-16 turned out to be a really bad idea. UTF-16 combines all of the disadvantages of UTF-8 with all of the disadvantages of UTF-32. In UTF-16 there are things known as “surrogate pairs”, which means a single Unicode codepoint might require two UTF-16 “characters” to describe it. Also the Byte Order Marks (BOM) introduced with UTF-16 proved to be problematic. Particularly if you cat files together you can end up with stray BOM indicators randomly embedded in your new file. They say that null was a billion dollar mistake, well, UTF-16 was the other billion dollar mistake.

tl;dr: don’t use UTF-16, but do use 7-bit ASCII and UTF-8.

Oh, and as we’re here, and talking about Unicode, did you know that you can support The Unicode Consortium with Unicode Adopt-a-Character? You send money to sponsor a character and they put your name up in lights! Win, win! (We noticed while doing the research for this post that Jeroen Frijters of IKVM fame has sponsored #, a nod to C#.)

If you’re interested in learning more about Unicode check out Understanding And Using Unicode and Building Up Unicode Characters One Bit At A Time.

A 1970s Electronic Game

What happens when a traditional board game company decides to break into electronic gaming? Well, if it were a UK gaming company in 1978, the result would be a Waddingtons 2001 The Game Machine that you can see in the video from [Re:Enthused] below.

The “deluxe console model” had four complete games: a shooting gallery, blackjack, Code Hunter, and Grand Prix. But when you were done having fun, no worries. The machine was also a basic calculator with a very strange keyboard. We couldn’t find an original retail price on these, but we’ve read it probably sold for £20 to £40, which, in 1978, was more than it sounds like today.

Like a board game, there were paper score sheets. The main console had die-cut panels to decorate the very tiny screen (which looks like a very simple vacuum fluorescent display) and provide labels for the buttons. While it isn’t very impressive today, it was quite the thing in 1978.

This would be a fun machine to clone and quite easy, given the current state of the art in most hacker labs. A 3D-printed case, color laser-printed overlays, and just about any processor you have lying around would make this a weekend project.

It is easy to forget how wowed people were by games like this when they were new. Then again, we don’t remember any of those games having a calculator.

As a side note, Waddingtons was most famous for their special production of Monopoly games at the request of MI9 during World War II. The games contained silk maps, money, and other aids to help prisoners of war escape.

❌