Vue lecture

Il y a de nouveaux articles disponibles, cliquez pour rafraîchir la page.

Harmonic Radar Finds Hidden Electronics

A diagram of a radar system is shown. A pair of antennas is shown on the left, with beams illuminating a number of electronic devices, labelled as "Concealed Targets."

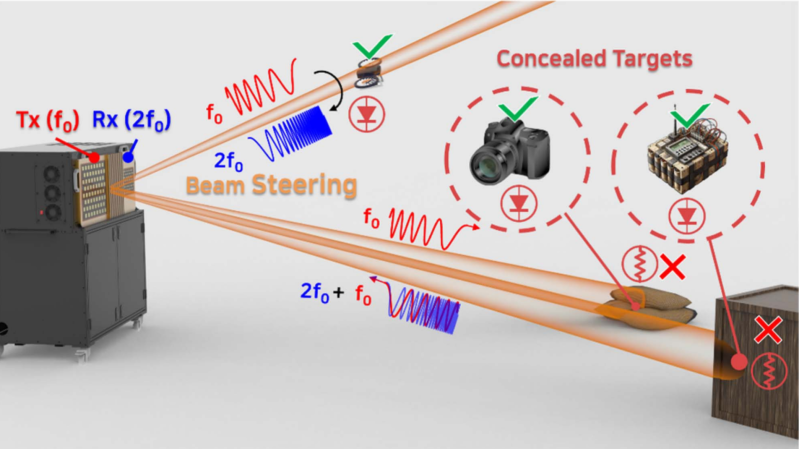
For as long as small, hidden radio transmitters have existed, people have wanted a technology to detect them. One of the more effective ways to find hidden electronics is the nonlinear junction detector, which illuminates the area under investigation with high-frequency radio waves. Any P-N semiconductor junctions in the area will emit radio waves at harmonic frequencies of the original wave, due to their non-linear electronic response. If, however, you suspect that the electronics might be connected to a dangerous device, you’ll want a way to detect them from a distance. One solution is harmonic radar (also known as nonlinear radar), such as this phased-array system, which detects and localizes the harmonic response to a radio wave.

One basic problem is that semiconductor devices are very rarely connected to antennas optimized for the transmission of whatever harmonic you’re looking for, so the amount of electromagnetic radiation they emit is extremely low. To generate a detectable signal, a high-power transmitter and a very high-gain receiver are necessary. Since semiconductor junctions emit stronger lower harmonics, this system transmits in the 3-3.2 GHz range and only receives the 6-6.4 GHz second harmonic; to avoid false positives, the transmitter provides 28.8 decibels of self-generated harmonic suppression. To localize a stronger illumination signal to a particular point, both the transmit and receive channels use beam-steering antenna arrays.

In testing, the system was able to easily detect several cameras, an infrared sensor, a drone, a walkie-talkie, and a touch sensor, all while they were completely unpowered, at a range up to about ten meters. Concealing the devices in a desk drawer increased the ranging error, but only by about ten percent. Even in the worst-case scenario, when the system was detecting multiple devices in the same scene, the ranging error never got worse than about 0.7 meters, and the angular error was never worse than about one degree.

For a refresher on the principles of the technology, we’ve covered nonlinear junction detectors before. While the complexity of this system seems to put it beyond the reach of amateurs, we’ve seen some equally impressive homemade radar systems before.

Does this Electron Make Me Look Fat? Weighing an Electron

[The Signal Path] shows us how to recreate a classic science experiment to measure the weight of an electron. Things are easier for us, because unlike [J. J. Thomson] in 1897, we have ready sources of electrons and measuring equipment. Check it out in the video below.

The main idea is to trap an electron using a magnetic field into a circular path. You can then compute the forces required to keep it in that circle, along with some other equations, and combine them. The result lets you compute the charge to mass ratio using parameters you can either control or measure, like the radius of the circular path and the electric field.

Helmholtz coils create the magnetic field, and a cold cathode tube provides the electrons. Honestly, the equipment looks a bit like something out of an old monster movie.

Of course, the result is the charge to mass ratio, which means to get the mass, you need to know the charge of the electron. Today, you can look that up, but in 1897, no one knew what it was. [Robert Millikan] would conduct another experiment using oil drops about a decade later to determine that number, and then the world could know the mass of a single electron.

The resulting ratio was very close to the accepted value. It would be fun to see someone replicate the oil drop experiment, too. You could spend a lot of time recreating classic science experiments. Some of the experiments are easy with today’s gear.

Argon ONE UP: Test-Tasting a Raspberry Pi CM5 Based Laptop

The Argon40 ONE UP unsurprisingly looks like a laptop. (Credit: Jeff Geerling)

The Raspberry Pi Compute Module form factor is a tantalizing core for a potential laptop, with a CM5 module containing a fairly beefy SoC and RAM, with depending on the exact module also eMMC storage and WiFi. To turn this into a laptop you need a PCB to put the CM5 module on and slide it into a laptop shell. This is in effect what [Argon40] did with their crowdfunded ONE UP laptop, which [Jeff Geerling] has been tinkering with for a few weeks now, with some thoughts on how practical the concept of a CM5-based laptop is.

Most practical is probably the DIY option that [Jeff] opted for with the ‘Shell’ version that he bought, as that meant that he could pop in one of the CM5s that he had lying around. The resulting device is totally functional as a laptop, with all the Raspberry Pi 5 levels of performance you’d expect and with the repair-friendliness of a Framework laptop.

If you’re buying the Core version with the 8 GB CM5 module and 256 GB NVMe SSD included, you’re looking at €475 before shipping or the equivalent in your local currency. This puts it unfortunately in the territory of budget x86 laptops and used Apple MacBooks, even before taking into account the current AI-induced RAMpocalypse that’d push [Jeff]’s configuration to $600 if purchased new, with prices likely to only go up.

Even if this price isn’t a concern, and you just want to have a CM5-based laptop, [Jeff]’s experience got soured on poor customer support from [Argon40] and above all the Raspberry Pi’s arch nemesis: the inability to do sleep mode. With the lid closed it runs at 3.3 W idle, but that’ll run down the battery from 100% to flat in about 17 hours. Perhaps if Raspberry Pi added sleep states to their systems would it make for a good laptop core, as well as for a smartphone.

❌